Node.js Passport and JWT Token-based API Authentication


Summary:A comprehensive guide on how to add API authentication in Node.js using Passport.js and JWT.
Security is a critical thing in web development and you need to know the working of authentication libraries before using them. A few years back while learning web development I copy-paste the authentication code for my side projects from various sources.
Things changed when I started on production sites. Security is the most important thing here. It was important to know how Passport.js and JWT token-based API authentication works behind the scenes.
I tried various sources like articles and videos but most of them were focused on 'how to do' rather than 'how it works'.
I spend almost 40 hours from over 200 sources including the Passport.js docs and this comprehensive article is the result of the same. All I need is your time to understand and learn Passport and JWT authentication for API in Node.js.
You can refer here to skip all important details and quickly get code for Passport and JWT token-based API authentication in Node.js.
What is Passport.js?
Passport.js provides simple authentication for Express based Node applications.
It is authentication middleware which can easily be integrated to any Express application to support hundreds of different authentication strategies including Facebook, Google, Twitter and Github logins.
The modern web applications can have many different forms of authentications like local username and password, OAuth or token-based authentication for API. Writing code for all these can be a burden and a security risk if anything goes wrong.
Pasport.js is a saviour in this situation. You can easily integrate it into your Express app and use its authentication strategies.
Passport.js Strategies
Passport.js has different authentication strategy which you can assume as plugins. There are 500+ strategies available in Passport.js and some of the popular ones are mentioned here.
passport-localfor local username and password-based authentication from the database.passport-facebookfor Facebook login functionality.passport-google-oauthfor login with Google functionality.passport-twitterfor twitter authentication.passport-jwtfor JWT based authentication.
Why use Passport.js?
If your application will need many authentication types like login with Google, Facebook, Twitter or GitHub then you should go for Passport.js.
It will make your task easier because it has hundreds of different authentication strategies which we can easily integrate.
For simple username and password-based authentication, I will suggest going with the manual process using Bcrypt.
What is JWT authentication?
JWT stands for JSON web tokens. These encoded tokens contain useful information to share between two parties (Server and end-user client in our case).
We encode some authentication information like userId and expiry date of the token and send it to the user to store on local storage. The token is sent with each request as Bearer token to authenticate the requests.
The server verify the token (through authentication middleware) and processes further either with resource or error.
Here is a visual representation of how the tokens actually work with API.
Open Image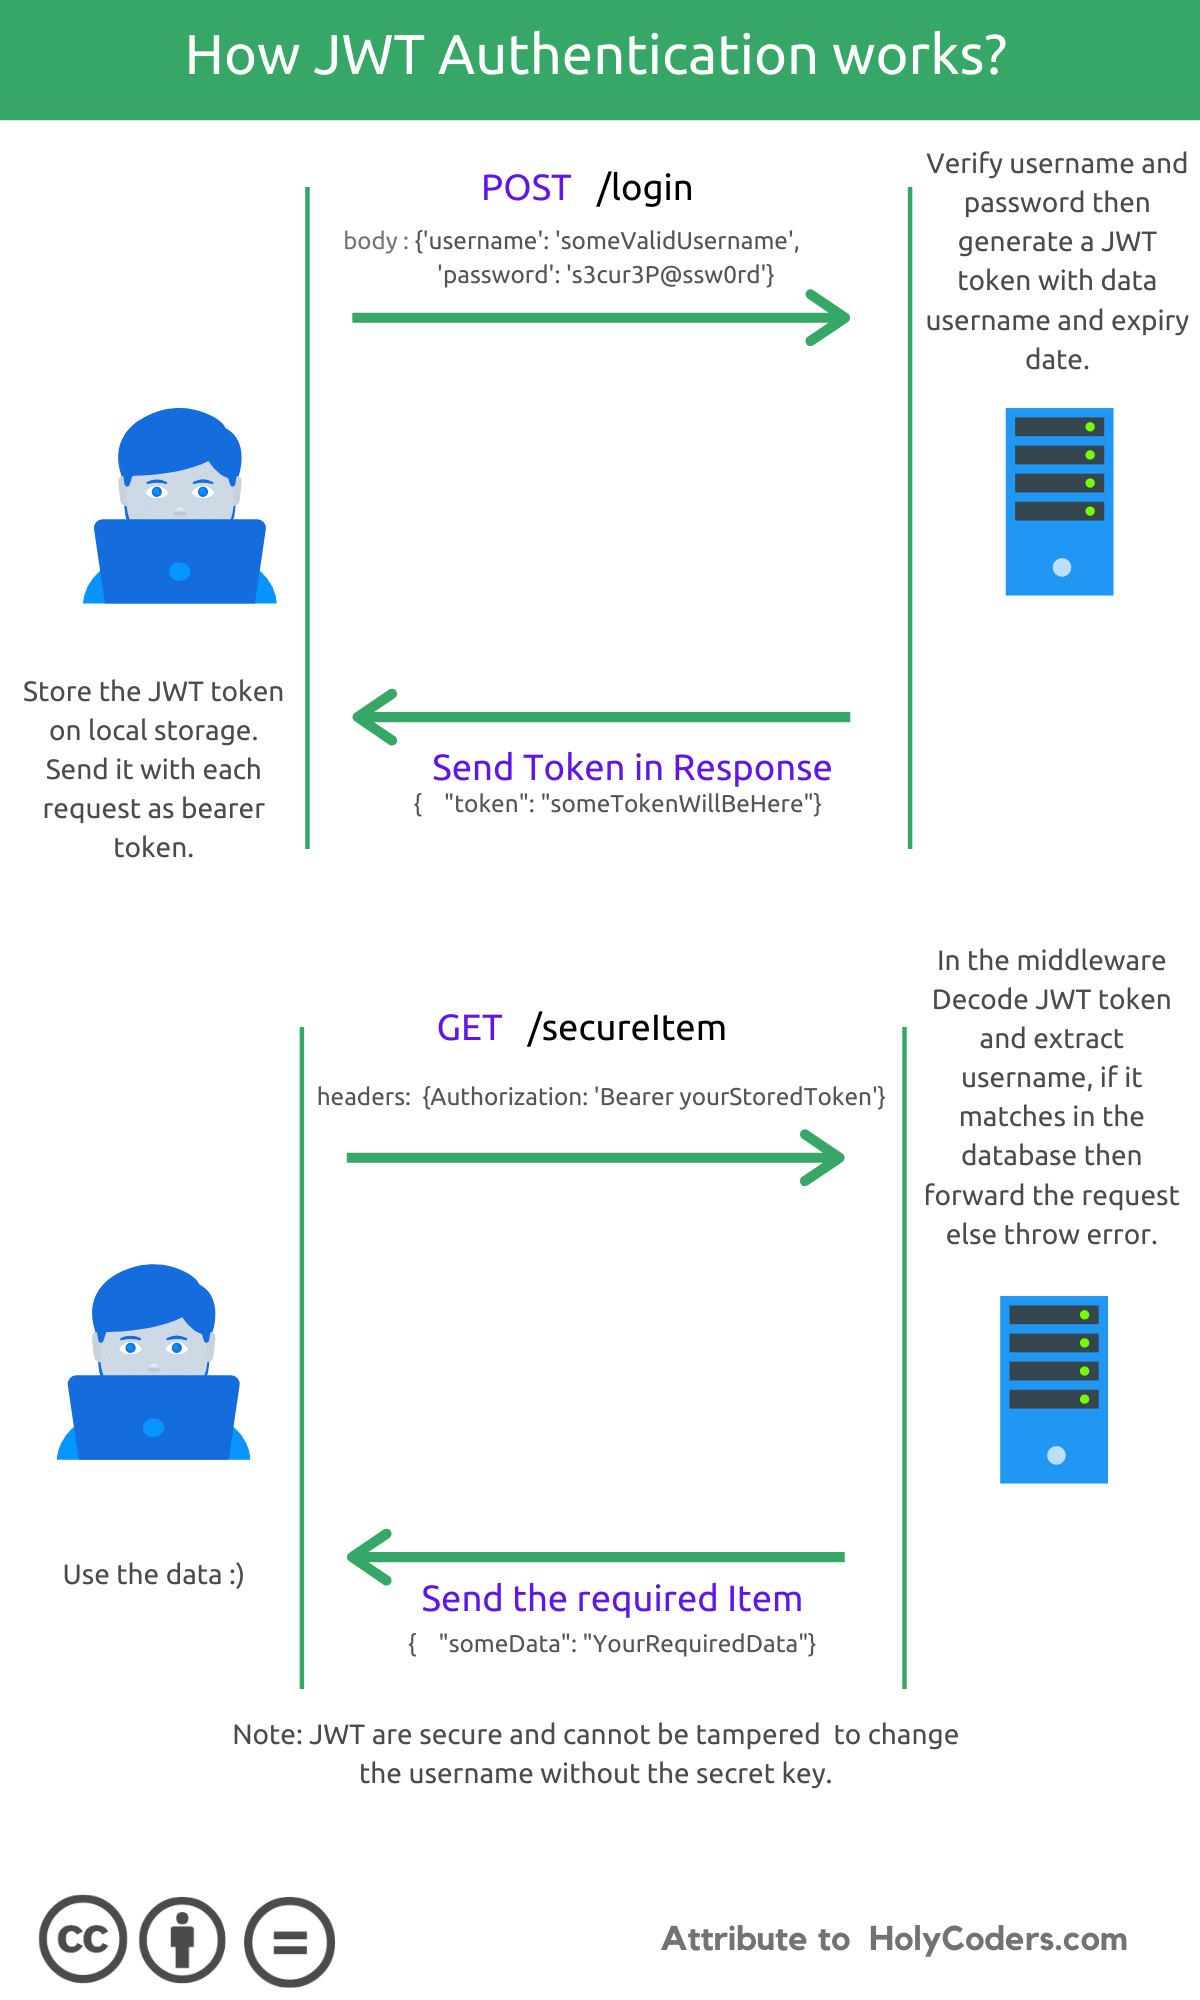
JWT authentication working
Node.js Passport-JWT Authentication
Here comes the actual coding part.
I have organised the code in a better folder structure.
-controllers
    -authController.js
    -postController.js
-middleware
    -auth.js
-models
    -user.js
-routes
    -authRoute.js
    -postRoute.js
-config.js
-index.js
-package.json
The config.js file contains the JWT configuration options which you need to store in environment variables in production for security.
The first step is to install all the necessary packages.
npm install express mongoose body-parser --save
npm install passport passport-local passport-local-mongoose passport-jwt jwt-simple --save- Passport.js for authentication.
- The passport-local is Passport.js plugin which provides the local username and password-based authentication strategy to the application.
- Passport-local-mongoose handles all the complex task of authentication with databases like hashing passwords and authenticating requests.
- Passport-jwt: It is Passport.js authentication strategy for JWT.
- JWT-simple: As the name suggests, it is a very minimal library for encoding and decoding JWT tokens.
Note: You can also use jsonwebtokens which is the most popular library for JWT encoding and decoding.
It's just a personal preference to use either jwt-simple or jsonwebtokens because both work fine.
The second step is to define a schema for users.
In models/user.js.
const mongoose = require("mongoose"),
  passportLocalMongoose = require("passport-local-mongoose");
var userSchema = new mongoose.Schema({
  name: String,
  username: String,
  password: String,
});
userSchema.plugin(passportLocalMongoose);
module.exports = mongoose.model("User", userSchema);
Note that we are not using password field here because passport-local-mongoose will take care of this.
Add config.js in the root folder which contains the configuration details for JWT encoding and decoding. It is recommended to put jwtSecret in an environment variable for better security.
module.exports = {
    jwtSecret: "s0m3$3Cret$h0lyC0d3&$",
    jwtSession: {
        session: false
    }
};
Now we need to add authentication controller which will handle the login and register functionality.
In controllers/authController.js
var express = require("express"),
  User = require("../models/user"),
  config = require("../config.js"),
  jwt = require("jwt-simple");

exports.login = function (req, res) {
  console.log("Logged In");
  User.findOne({ username: req.body.username }, (err, user) => {
    if (err) {
      console.log("Error Happened In auth /token Route");
    } else {
      var payload = {
        id: user.id,
        expire: Date.now() + 1000 * 60 * 60 * 24 * 7, //7 days
      };
      var token = jwt.encode(payload, config.jwtSecret);
      res.json({
        token: token,
      });
    }
  });
};
exports.register = function (req, res) {
  User.register(
    new User({ name: req.body.name, username: req.body.username }),
    req.body.password,
    function (err, msg) {
      if (err) {
        res.send(err);
      } else {
        res.send({ message: "Successful" });
      }
    }
  );
};
We need POST routes for login and register functionality.
In routes/authRoute.js
const User = require('../models/user');
var express = require('express');
var passport = require('passport');
var router = express.Router();
var authController = require('../controllers/authController')

router.post("/login", passport.authenticate("local") ,  authController.login)
router.post("/register", authController.register)

module.exports = router
The authentication middleware will take the token from the request header and verify if it is valid or not. We can use the authentication middleware to protect certain routes from unauthenticated users.
In middleware/auth.js
// auth.js
var passport = require("passport");
var passportJWT = require("passport-jwt");
var User = require("../models/user");
var cfg = require("../config.js");
var ExtractJwt = passportJWT.ExtractJwt;
var Strategy = passportJWT.Strategy;
var params = {
  secretOrKey: cfg.jwtSecret,
  jwtFromRequest: ExtractJwt.fromAuthHeaderAsBearerToken("jwt")
};

module.exports = function() {
  var strategy = new Strategy(params, function(payload, done) {
    var user = User.findById(payload.id, function(err, user) {
      if (err) {
        return done(new Error("UserNotFound"), null);
      } else if(payload.expire<=Date.now()) {
        return done(new Error("TokenExpired"), null);
      } else{
        return done(null, user);
      }
    });
  });
  passport.use(strategy);
  return {
    initialize: function() {
      return passport.initialize();
    },
    authenticate: function() {
      return passport.authenticate("jwt", cfg.jwtSession);
    }
  };
};
In index.js
const express = require("express"),
  app = express(),
  authRoute = require("./routes/authRoute"),
  postRoute = require("./routes/postRoute"),
  auth = require('./middleware/auth.js')(),
  mongoose = require("mongoose"),
  passport = require("passport"),
  localStrategy = require("passport-local"),
  User = require("./models/user"),
  bodyParser = require("body-parser");

mongoose.connect("mongodb://localhost/sampledb", {
  useNewUrlParser: true,
  useUnifiedTopology: true,
});
app.use(bodyParser.urlencoded({ extended: false }));
app.use(bodyParser.json());
app.use(auth.initialize());
// Passport Config
passport.use(new localStrategy(User.authenticate()));
app.use(passport.initialize());
app.use(passport.session());
passport.serializeUser(User.serializeUser());
passport.deserializeUser(User.deserializeUser());

app.use(authRoute);
app.use(postRoute);

app.listen(3001, () => {
  console.log("Server Started at 3001");
});
Now the user can register by sending the name, username and password to the register API and get the token by passing username and password to login route.
Verify the working of API
Now we can secure any route by using the middleware.
To verify this we will add a dummy route and controller to handle GET request for a single blog post.
In routes/PostRoute.js
var express = require("express");
var router = express.Router();
var postController = require("../controllers/postController");
var auth = require("../middleware/auth")();
router.get("/mypost", auth.authenticate(), postController.get_post);

module.exports = router; In controllers/postController.js.
exports.get_post = function (req, res) {
  res.send("Secret Post")
};
Now we can verify the working of our API through Postman software.
We pass name, username and password to the register route and it registers a new user.
Open Image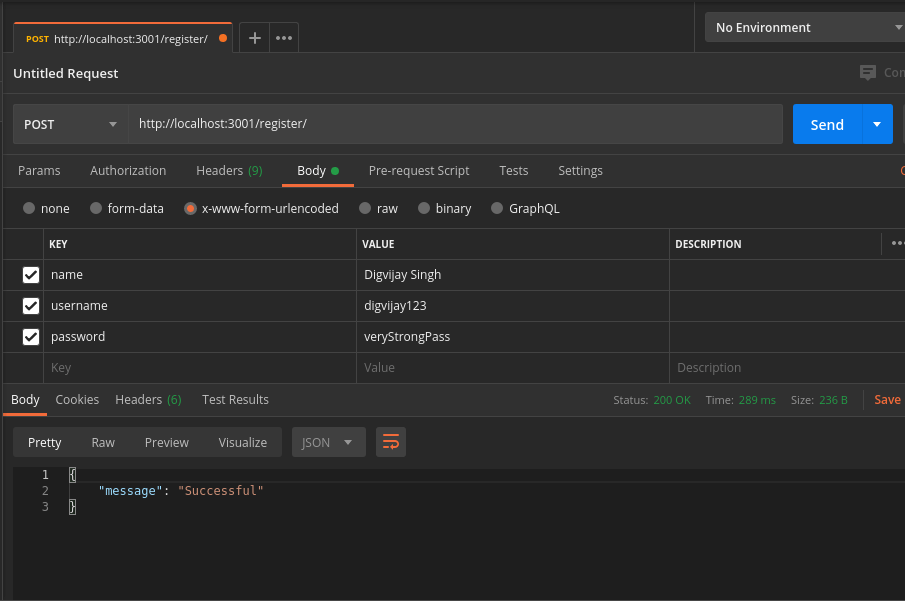
Register new user with NOde.js and Passport.js
Then we can pass the username and password to the login route and it will return a token.
Open Image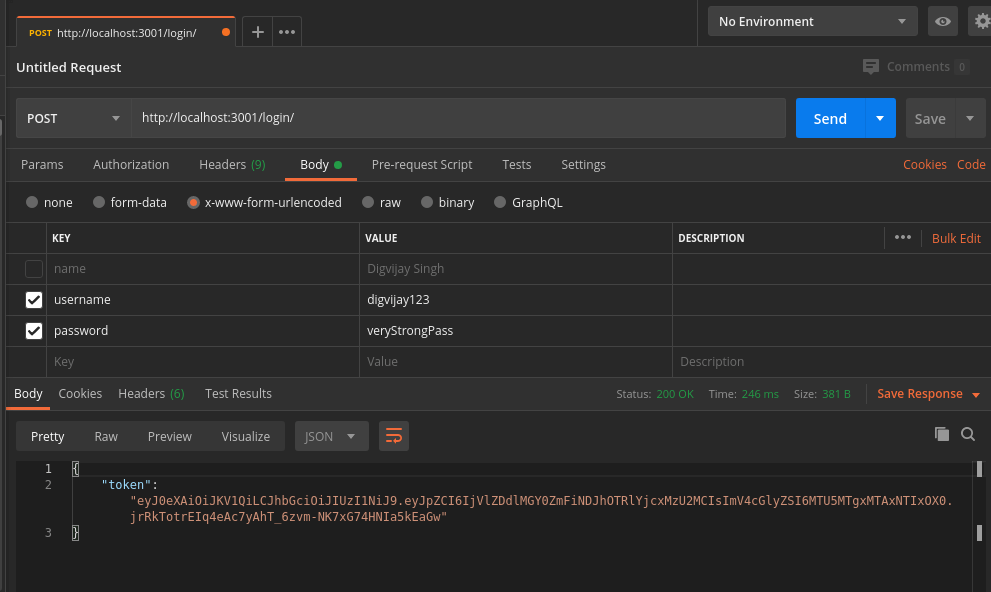
Get token for user user using Passport.js and JWT authentication in Node.js
Use the token to authenticate your requests, pass it as bearer token in the header.
Open Image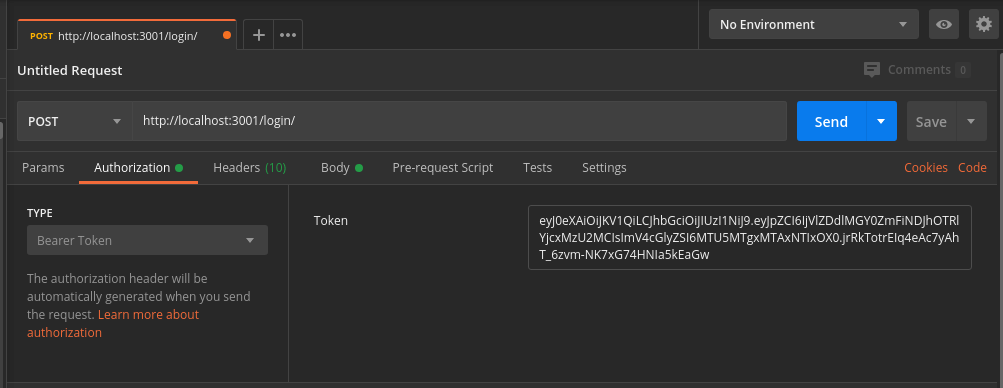
Put the JWT token as bearer token in each request
Now, the authentication protected routes are accessible.
Open Image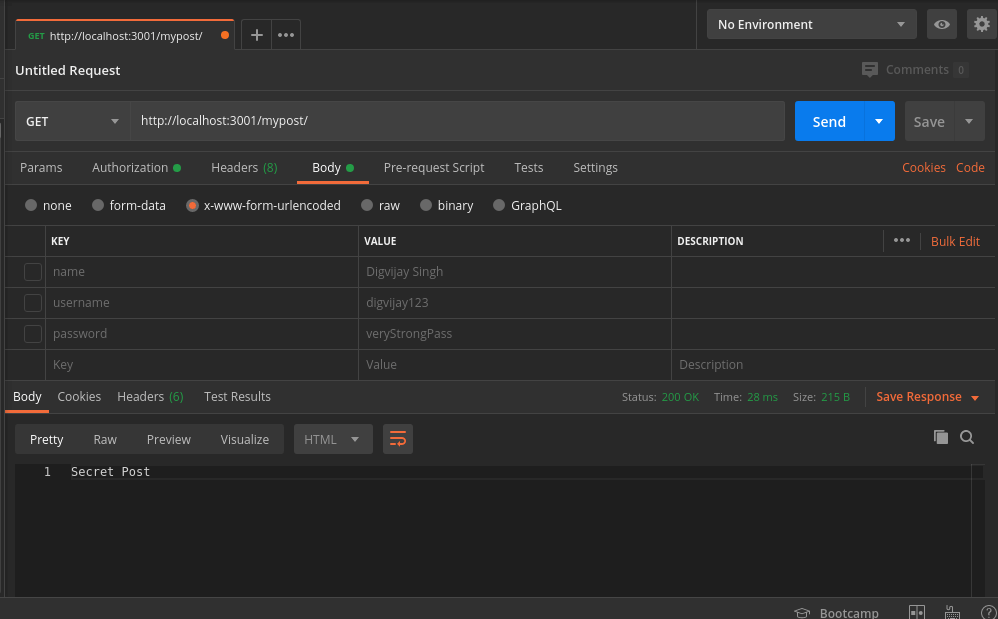
Secret route access using the token
Sending wrong token will lead to an 401 unauthorized error.
Open Image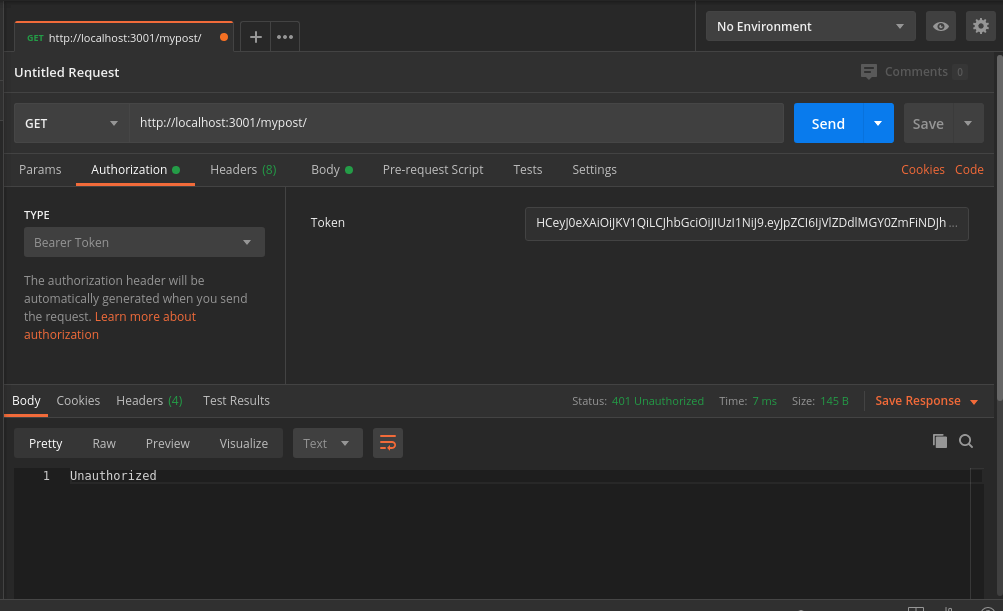
Wrong token means Unauthorized error.
You can find the full source code on GitHub.
Join Our Youtube Channel
Subscribe